The Apple iOS Push Certificate must be renewed every year. If the certificate expires (or is revoked) all devices must be re-enrolled in Afaria. Something you want to avoid at any cost.
This blog will show you how to do this for a single Afaria 7 (SP 08) installation on Windows (Server 2008 R2). The information this post relies on is spread over following SAP knowledgebase articles:
Renewing the iOS Push Certificate
Create a certificate request
We begin with creating a certificate request. I usually do this on the Afaria machine, but any machine will do.
- Open IIS and navigate to <Machine Name> -> Server Certificates
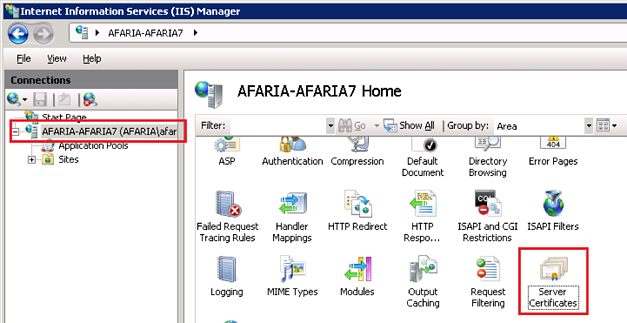
- On the “Server Certificates” screen press „Create Certificate Request“ on the right side
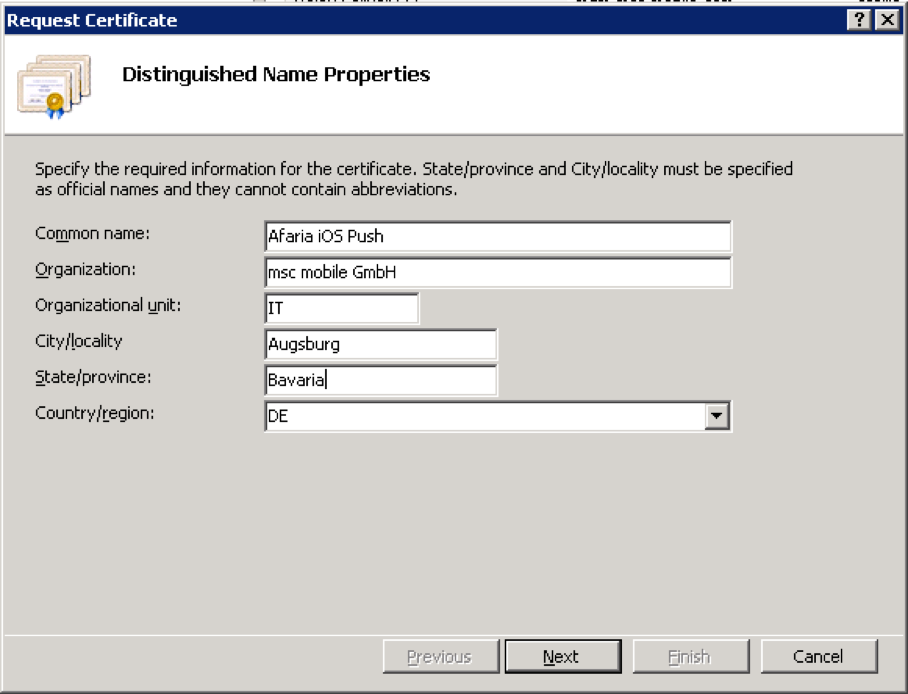
- On the “Request Certificate” popup enter the values appropriate for your organization, e.g.
- In the next screen leave the „Cryptographic service provider“ untouched, just change „Bit length“ to 2048
- Finish the certificate request by saving it to a text file.
Get the certificate request signed
The next step is to get the certificate request signed on the Sybase site.
- With your preferred web browser navigate to https://frontline.sybase.com/support and log in using your Sybase Mobile Technical Support Account
- On the left side navigation go to “Apple CSR Signing”
- Using the Web-UI select the certificate request file created earlier and upload it.
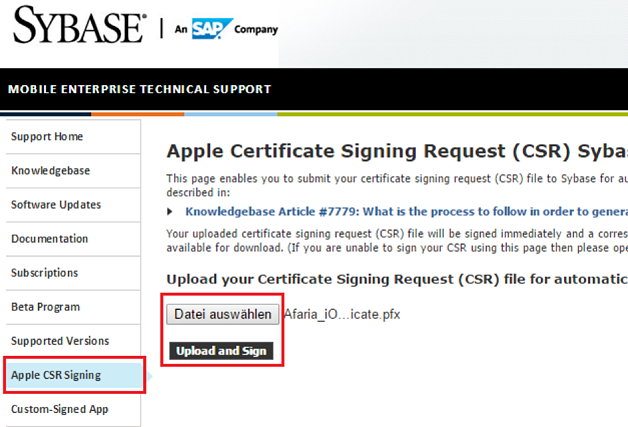
- Now the signed certificate request (SCSR) file will be presented for download. Download it and proceed to the next step
Renew the iOS Push certificate with the signed certificate request
With the SCSR file we are now able to renew the iOS Push certificate on the apple site.
- Using a compatible browser (Safari should work best) navigate to https://identity.apple.com/pushcert and log in using your Apple ID
- In the next screen identify your current push certificate. If you have multiple certificates you can identify the correct one by pressing the “i” button left to the “Renew” button

- Press „Renew“ on the push certificate you want to renew.
- In the next screen select the SCSR file created before and upload it
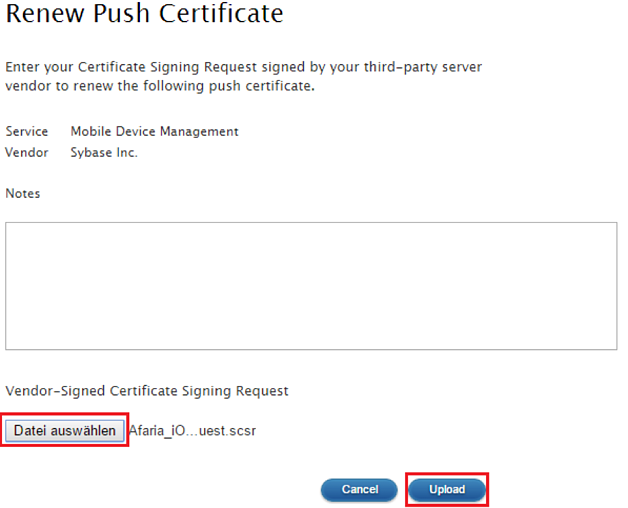
- You will be presented to download the new push certificate. Download the .pem file and complete the certificate request
Complete the certificate request
With the renewed push certificate (.pem) file continue on the same machine you created the certificate request.
- Open IIS and go to <Machine Name> -> Server Certificates
- Press “Complete Certificate Request”
- Select the downloaded .pem file from before and enter a friendly name for the certificate
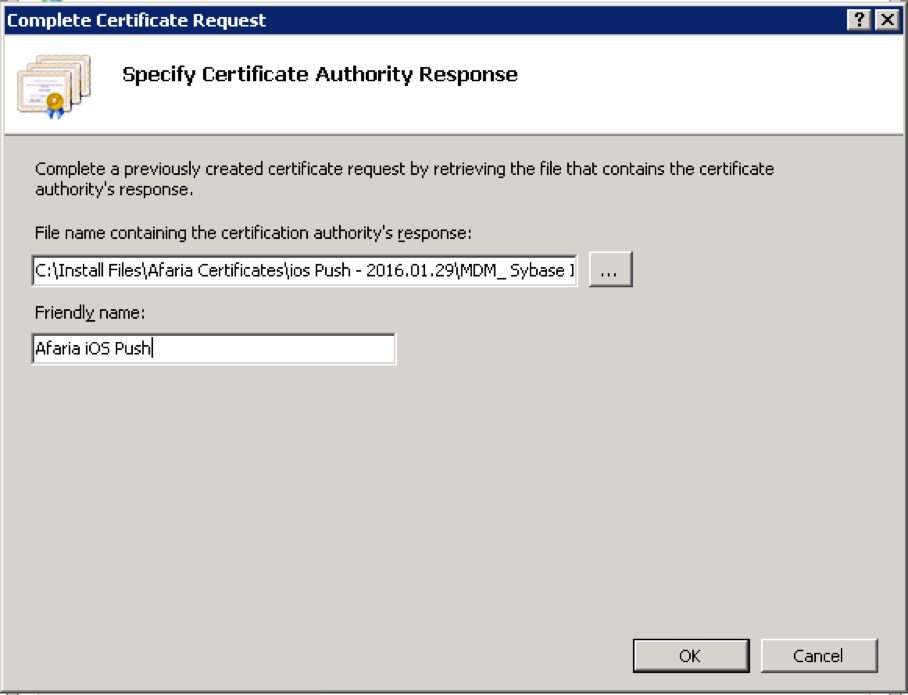
- Back in the “Server Certificate” screen the new push certificate can be seen. Right click it and select “Export”
- Export the certificate to a .pfx file
If you did not do the renew certificate procedure on your Afaria machine you will need to import this certificate (.pfx file) to the personal certificate store on your Afaria machine.
Adjust security settings on the new Push Certificate
In case you get an “unsigned Config Payload” presented during iOS device enrolment you need to do the following:
- On the Afaria machine open mmc.exe
- Add the Snap-in for “Certificates”, “Computer account”, “local Computer”
- Open the “Personal” store
- Identify your new iOS Push Certificate, right click on it -> All Tasks -> Manage Private Keys
- In the popup add the local IIS_IUSRS account

- Change the permission for the IIS_IUSRS account to “Read”

- Press “Apply” and close the popup.
- Do an IIS reset or restart the machine.
Integrate the renewed certificate in Afaria
Almost done, we only need to integrate the new push certificate into Afaria.
- Log into Afaria Administrator
- Go to Server -> Configuration -> Component -> iOS Notification (may differ depending on Afaria version)
- In the “APNS Push Certificate” Area press “Browse” and select the exported push certificate (.pfx file) from before.
- Enter the password for the .pfx file and press “Install”
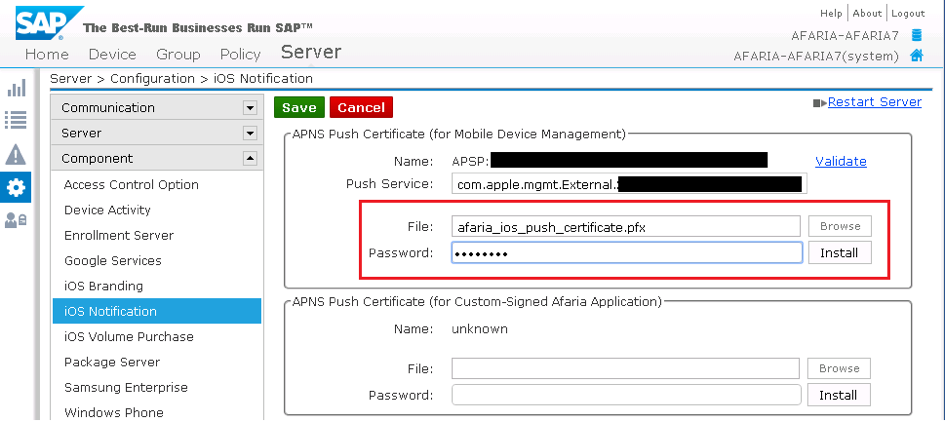
- Before saving your changes make sure you validate the installed certificate. Check the expiration date
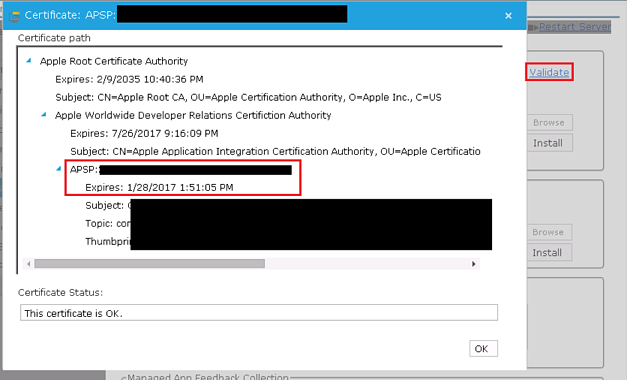
- Save your changes and restart the Afaria server (It would not hurt to restart the whole machine)
Now you are done renewing the Apple iOS Push Certificate for your Afaria installation. It is a long and complex process, but with this step-by-step instructions, you should be able to do it.
